OSI Model Overall
OSI Model consists of 7 layers.
- physical , data link, network, transport, session, presentation, application
(Please Do Not Teach Students Pointless Abbreviation!)

Layer 1) Physical
Bits, Medium, Wiring standards, Physical topology,
Synchronizing bits, Bandwidth usage, Multiplexing strategy
- physical and electrical characteristics.
How are bits represented on the medium?
- Electrical voltage or light
- Current State
- Transition Modulation
How are the cables wired?
- 2 std inside of network.
- TIA/EIA-568-B is standard wiring for RJ-45 cables and ports (?)
- cross over cable : A std - Bstd
- straing-thru cable : B std - B std or A std - A std
How are the cables connected?
- add pros/cons on the picture
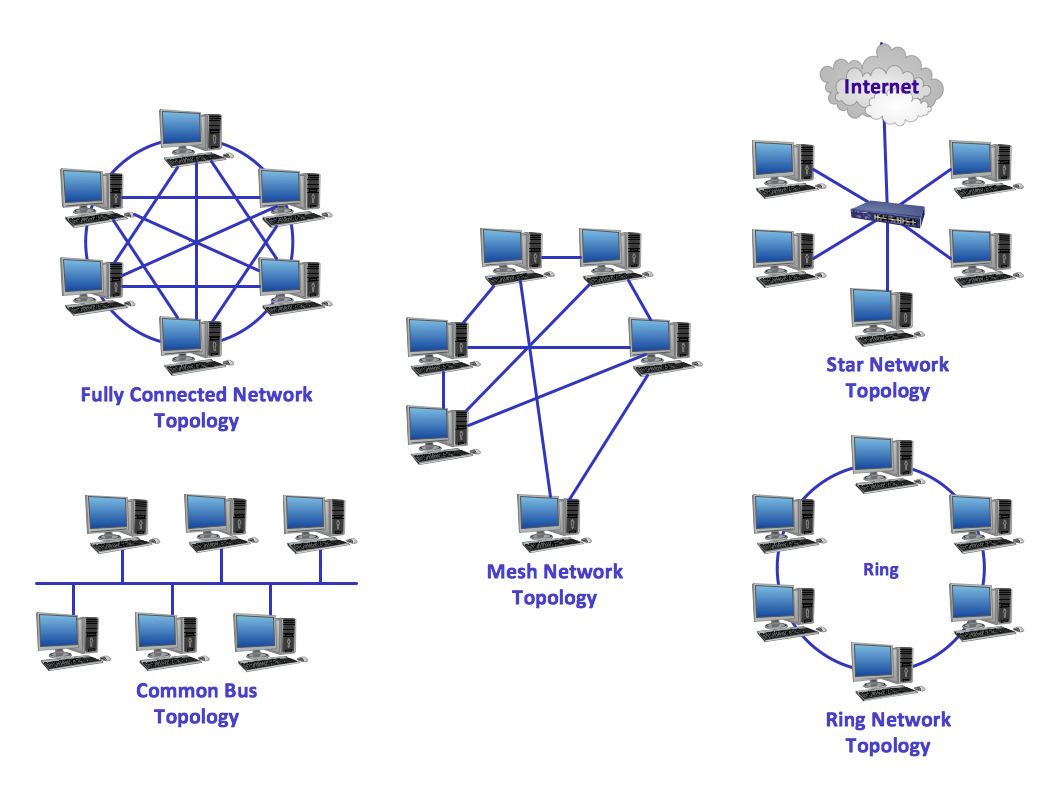
source : https://www.conceptdraw.com/How-To-Guide/network-topologies
How is communication synchronized?
- Asynchronous : uses start/stop bits to notify transmission occured.
- Synchronous : uses a reference clock to coordinate the transmission
How is bandwidth utilized?
- broadband : like TV channel. we only pulled out the ones we wanted
- baseband : like telephone, using all of the bandwidth allocated to that phone line, reference clock. (example of synchronous communication)
Layer 1 Devices
- Cables : Ethernet, Fiber optic
- Radio frequencies : Wi-Fi, Bluetooth
- Infrastructure devices : Hubs, Wireless Access Points, Media Converters
Layer 2) Data Link
MAC, Physical addressing, Logical topology, Method of Transmission, LLC, Flow control
consists of 2 sublayers, Media Access Control and Logical Link Control.
data –(Data Link)–> frames

(source : https://www.youtube.com/watch?v=Ilk7UXzV_Qc)
Error detection/correction
identification of network devices with an address (MAC)
Media Access Control (MAC)
Many stations vying each other to occupy the cable. This is called media access, and there are several strategies.
Carrier Sence/Multiple Access with Collision Detection (CSMA/CD)
If the device uses this method, then it first detect the signal on the wire(a carrier). Signal on the wire means that someone is already transmitting the data.
- It detects a signal on the wire.
- If there is no signal, then it sends signal. If other device did the same , then collision happens.
- After certain amount of time, It sends its signal again.
Token Passing
The first computer turned on creates a token.
The token passes around till it finds computer with data to send.
The token with data has the address. Each station checks the address in the token.
If the address in the token matches its own address, then it receives data, and modifies the token that it has received the data.
The token is sent back to the original sender, and finally becomes free.
No collision occurs!
Carrier Sense/Multiple Access with Collision Avoicance(CSMA/CA)
This method is similar to CSMA/CD method. The difference is that It sends a request to send(RTS) packet and wait for clear to send(CTS) before sending.
(I wonder if does have a collsion issue. It seems like, if it has a bad luck, it might happen.)
Physical addressing. protocol-independent address
- First 24-bits : the vendor code
- Second 24-bits : a unique value
- Hexadecimal number system

Logical topology
dictates the way the information flow. Types are the same as physical topology
Three main methods.
Contention :
Stations seek for the chance to transmission of data. If collision occurs, the stations try to send data again.
Polling :
Central device polls each device whether it has data to send or not. No collision problem.
Token passing :
Token is a special data packet. If the device has a token, then it can transmit its data. No collision problem.
Logical Link Control (LLC)
- Acknowledgement of receipt of a message.
- Flow control : controls the load of data to optimize the performance.
- Error control : sends again if the data is not received or coruppted.
How is communication synchronized?
(learn more to understand fully)
- Isochronous :
- create time slots by using a common reference clock source.
- Less overhead(?) than other two method.
- Synchronous :
- uses clocking method to indicate start/end of frames.
- Asynchronous :
- uses their own internal clocks and use start/stop bits.
Layer 2 Devices
- Network Interface Cards (NIC)
- Bridges
- Switches
Layer 3) Network
Logical address, Switching (not SWITCH), Route discovery and selection, Connection services, Bandwidth usage, Multiplexing strategy
- forward traffic with logical address such as IP Address.
- Every device has an assigned address by factory. This
Logical address
- Internet Protocol(IP) is dominantly used. (IP v4, IP v6)
How should data be forwarded or routed?
(learn more to understand fully)
- Packet swtiching (routing) : Data is divided into packets and forwarded.
- Circuit switching : Dedicated communication link is established between two devices
- Message switching : Data is divided into messages.
? what is the difference between Packet switching and Message switching?
Static routing : The network admin manually updates the router’s routing tables.
Dynamic routing : uses route discovery protocols to talk to other routeres.
Route Discovery and Selection
Routing table, Routing Protocol
- A routing table contains info about where to forward a packet based on destination IP address.
- Manually configured as a static route or dynamically through a routing protocol (RIP, OSPF, EIGRP) –> ?
Connection Services
- Layer 3 augment Layer 2 to improve reliability
- Flow control, Packet reordering (how does it work in detail? with LLC in layer 2?)
Internet Control Message Protocol (ICMP)
- sends error messages and operational info about an IP destination
- Used in troubleshooting (ping and traceroute)
Layer 3 Devices/Protocols
- Routers
- Multilayer switches
- IPv4 protocol / IPv6 protocol / Internet Control Message Protocol (ICMP)
Layer 4) Transport
TCP/UDP, Windowing, Buffering
- The start of upper layer.
Transmission Control Protocol (TCP)
Connection-oriented protocol
If segment is not sent well, then protocol will resend segment
Acknowledgements recevied for succssful communications
Three way handshake

User Datagram Protocol (UDP)
- Connectionless protocol
- Even though data is not sent well, sender does not know
- Good for audio/video streaming

Source : https://www.udemy.com/course/networkplus/
Windowing
- It helps client to send the right amount of data in each segment by evaluating how often retransmisions occured.
(Ex. Downloading Videos. The downloading speed keeps changing)
Buffering
- If bandwdith is not available, Device allocate memory to store segements.
- If bandwidth is available, it transmits the contents of the buffer.
- If the buffer overflows, then segments will be dropped.
Layer 4 Devices/Protocols
- TCP
- UDP
- WAN Accelerators
- Load Balancers
- Firewalls
Layer 5) Session
Setting up session, Maintaining sessions, Tearing down sessions
- Session layer is different from Transport layer in that it sees a bigger picture, and focus on entire conversation rather than one sentence.
Setting up a Session
- Assign numbers to session to identify them
- Negotiate services needed for session and who begins sending data
Maintaining a Session
- Transfer the data (respond/request)
- Restart a disconnected session
Tearing Down a Session
- After the transfer is over, the session ends with mutual agreement.
Layer 5 Devices/Protocols
- H.323
- NetBIOS
Layer 6) Presentation
Encryption, Data compression, network redirectors, Data format
- It converts data format for both upper and lower layer, so they can understand each other, like a translator.
Data Formatting
Formats data for proper compatibility between devices
Ensures data is readable by receiving system.
Most standard computer systems use the ASCII, but some other computer uses EBCDIC.
Protocol at the transport layer can translate between the two.
Encryption
Used to scramble the data in transit to keep it secure from prying eyes
TLS to secure data between your PC and website (lock shows that it is encrypted)

Layer 6 Protocols
- HTML, XML, PHP, JavaScript, …
- ASCII, EBCDIC, UNICODE, …
- GIF, JPG, TIF, SVG, PNG, …
- MPG, MOV, …
- TLS, SSL, …
Layer 7) Application
Application services, Network management activities
- Provides application level services
- Layer where the users communicate with the computer (not notepad, not word, not eclipse…)
Application Services
- Application services unite communicating components from more than one network application
- Examples
- E-mail (POP3, IMAP, SMTP)
- File Transfer Protocol (FTP, FTPS)
- Remote Access (TELNET, SSH)
- Web Browsing (HTTP, HTTPS)
- Domain Name Service (DNS)
Network management activities
- Client/server processes
- States the services they offer on the network (Printers ,File servers)
- Examples
- Simple Network Management Protocol (SNMP)


